
Decorating 101: Wallpapering – The Stairwell
Papering A Stairwell
Hanging wallpaper in an ordinary room is not too tricky, but stairwells have a little more to contend with – the long lengths and awkward corners to name just two, in this blog you will find that these difficulties can be overcome.
The main problem we all face in wallpapering a stairwell is gaining access to the walls we are decorating. This is because of the heights involved and the awkward angles involved. It is essential to have a safe working platform and to set this up correctly to suit the stairwell’s layout and the way the stairs rise.
Platforms can be hired to decorate these areas along with components from a tower platform.
Alternatively, you can use ladders linked with scaffold boards (see the image below). A particularly useful tool is a hop-up, a small platform you can make yourself.

Preparation
Before you start decorating, remove any handrails and other wall-mounted objects so you can get clear access to the wall.
Now prepare the walls properly so that the wallpaper will adhere (always remove any old wallcoverings/flaking paint, some will peel off although most types will require soaking and scraping).
See our blog on wall preparation here.
Once the walls are stripped you can work out where to begin hanging, you should position the longest drop of wallcovering first, you may need to use a tape measure to find the longest length, along with someone to help you when measuring the stairwell.
You want to work as close to this point as possible, but you should keep around 50mm (2 inches) away from any obstacles – such as a door or window.
Using a full roll of the wallpaper move it along the wall estimating where succeeding widths will fall and if according to these estimations, you will have a join within 50mm of an external corner (such as a window opening) change your starting point.
Measure again so you can avoid this, then mark again where the first drop should be hung.
When you have established where you will hang the first drop, use a plumb line / plumb bob to work out a true vertical line at this point.
To help make this mark for your long drops, coat the string in chalk, hang the line up until it stops, have the bob held down and snap the string under tension against the wall The remaining line should be adequate to work from.
Alternatively, you can fix a timber batten against the line and draw a vertical pencil line down the wall (remember to plumb a new line every time you turn a corner).
Hanging the wallcovering
The decorating sequence is the same for any other area, we covered these techniques in our previous blog.
If the walls are bare plaster, start by sizing the wall to prevent the paste from soaking in.
Measure and cut your wallcoverings to length, remembering to allow for the angle of the skirting board if this is applicable, paste it and allow it to soak.
Wallcoverings that are paste-the-wall are particularly easy to hang in stairwells because you are handling lengths of dry wallcovering.
Because the lengths of paper are so different on the side of the stairs, caused by the rise of the stairs, it is likely best to cut and paste one length at a time for the longest or most complicated lengths, unlike in a standard room where you can cut the majority of lengths at once.
Hang the first and longest length of the wallpaper, using a vertical line you should have marked on the wall during your preparations as a guideline to get it straight.
Now continue to work around the staircase from this length, making sure the pattern matches as you go progress.
If your staircase is curved at the bottom then the wallpaper may pucker as it fits around this curve.
To prevent this, you can snip into the overlap at the foot of the wall at intervals so the paper is more flexible in its fit.
Coping with long drops
A problem that is unique to stairwells is the length of the paper you are handling, often around 4.5m (15″) long.
Apply the paste liberally the longest lengths so it is less likely to dry out before you have fixed the bottom of the length
Keep a small amount of adhesive to hand to touch up any patches of the paper that has dried out before the wallpaper is fixed.
Fold the lengths of pasted paper in concertinas (multiple folds, pasted side to pasted side), gather up the folds and drape the folded-up length over your arm to carry it when you’re ready to hang this.
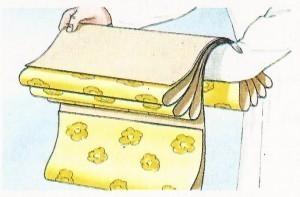
Due to the weight of the pasted length you must be careful that it does not stretch or tear during hanging.
Try to get someone to support the remaining folded-up wallpaper as you are hanging it.
If no one is available to help – you will need to sit on your scaffold board (or another form of support) and allow the bottom of the drop to unfold gently down the wall to skirting board level.
Now proceed to offer the top up to the ceiling and start brushing it into place.
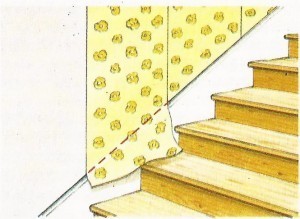
Please remember that when you are trimming along the bottom of the wallpaper length, where the wallpaper meets the skirting board, you will be cutting at an angle rather than horizontally as at the foot of a wall in a standard room.
Continue to hang your wallpaper drop by drop until your longest lengths have covered the tallest walls in your stairway.
Browse all our wallpapers when you are ready to give your hall, stairs and landing a fabulous new look!
Comments are closed here.